
Quick answer
Install Killer Vibe from Overwolf, open Setup, choose a supported game and event, assign a clip, select the output device you actually use, set a safe volume, enable the event, and test it in the game. The sound plays when Killer Vibe receives that supported event; it is not sent into voice chat automatically.
Before you start
- Install Overwolf and sign in if Overwolf requires it.
- Install Killer Vibe from its Overwolf listing.
- Connect the headphones, speakers, or virtual output you intend to use.
- Update the supported game, Overwolf, and Killer Vibe before testing.
- Start with one short clip and a conservative volume. Add complexity only after the first event works.
Set up your first automatic reaction
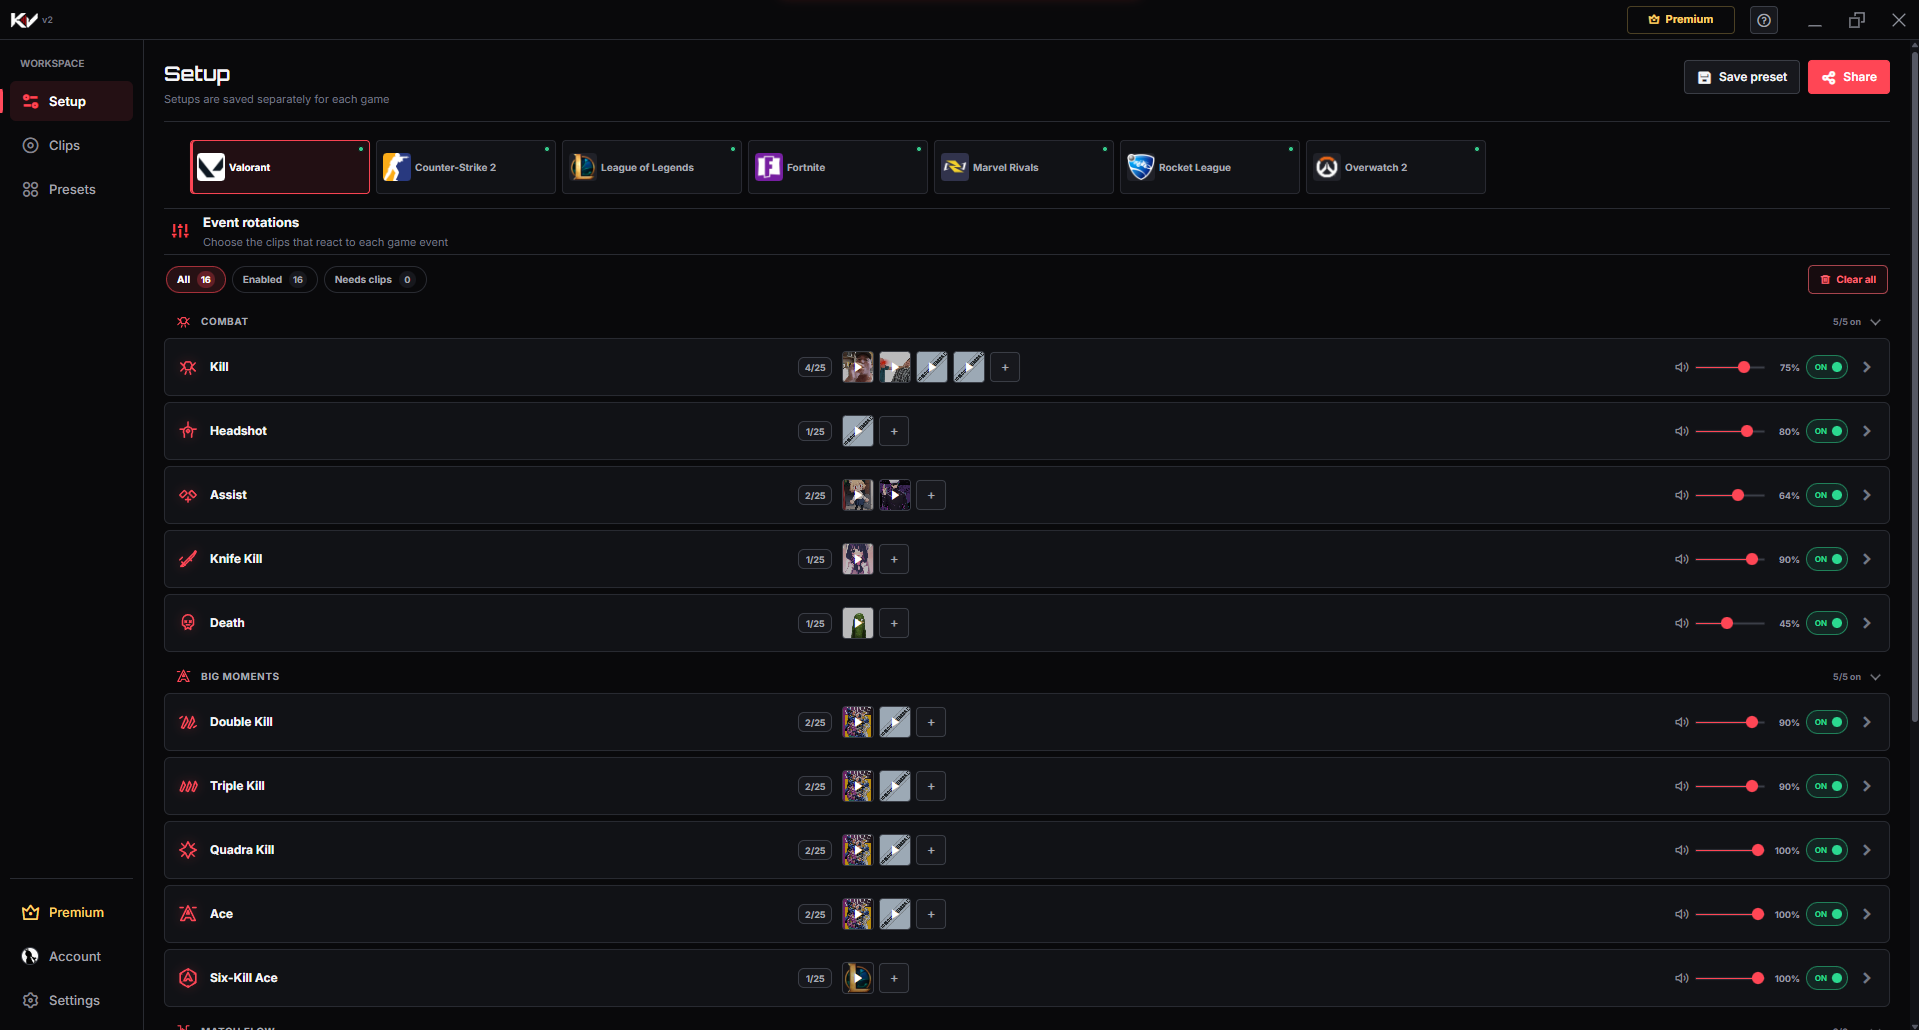
- Open Setup. Launch Killer Vibe and use the Setup workspace rather than guessing from an older tutorial or screenshot.
- Select your game. The event list below the game selector updates to the labels currently available for that title.
- Choose one supported event. Start with a common event shown in the app, such as Kill, Death, Match Start, or another label listed for your game.
- Add a clip. Search the available library or choose a local MP3/OGG clip from your PC. The free plan supports up to five clips per event; use the capacity displayed in your app if your plan differs.
- Preview before saving. Use the playback control to confirm the clip loads, begins where expected, and is not distorted.
- Choose the selected output device and volume. Send playback to the device you can monitor. Keep the first test below your game and voice level.
- Enable and save the event. Confirm the event switch is on and the assigned clip remains visible after you leave and return to Setup.
- Launch the supported game. Trigger the configured event in a low-risk mode and listen for the assigned reaction.
How to verify the setup
A successful first test has four signals:
- The clip previews inside Killer Vibe.
- The event is enabled and still shows the assigned clip.
- The sound reaches the selected output device.
- The same clip plays after the matching supported event occurs in game.
Streamers need one additional check: record 20–30 seconds in OBS and confirm the clip appears on the intended audio meter and in the saved recording. Hearing it in your headphones does not prove the stream captures it.
Troubleshooting
Preview is silent: reselect the output device, lower neither the app nor Windows device to mute, and try another known-good clip.
Preview works but the event does not: confirm the event is enabled, keep Overwolf running, update both apps, and test an event listed for that exact game.
The wrong clip plays: reopen the event rotation, review every assigned clip, remove unwanted items, and save again.
The stream is silent: make sure OBS captures the same device or output route selected in Killer Vibe, then make another short recording.
A local clip disappeared: check that the source file was not moved, renamed, or deleted from the PC.
Limits to know
- Only events shown for the selected game can trigger reactions. Coverage differs by game and may change with game or Overwolf updates.
- Killer Vibe plays through your selected output device. It does not inject audio into Discord, your microphone, or in-game voice chat.
- OBS does not hear Killer Vibe automatically; the chosen output must be part of the capture mix.
- Performance depends on your PC, game, and active overlays. Test with your normal setup rather than relying on a universal FPS claim.
- Use clips you created, licensed, or have permission to play or broadcast.
Choose your game guide
Each page lists the exact supported event labels and the audio limitations for that game:
- Valorant events and setup
- League of Legends events and setup
- Fortnite events and setup
- Counter-Strike 2 events and setup
- Marvel Rivals events and setup
- Rocket League events and setup
- Overwatch 2 events and setup
Next: import a local MP3 or OGG clip, or route Killer Vibe audio into OBS.